Real Pros

When I went to buy roofing materials, the person at Western Gravel & Roofing Supply talked me into hiring a contractor: He was afraid I’d burn down my house with the torch (!) and recommended a contractor who happened to be in line.

What a contrast to the last roofers we hired. These guys were awesome!

01-roof_2013071002-roof_20130710

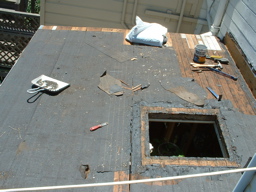
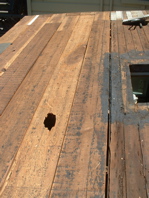
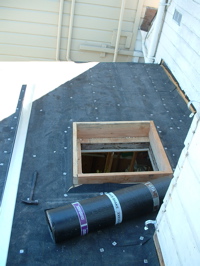
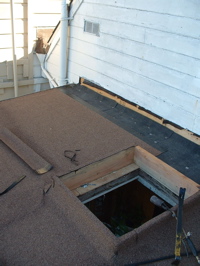
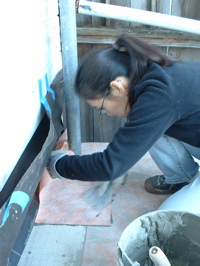
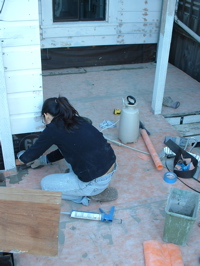
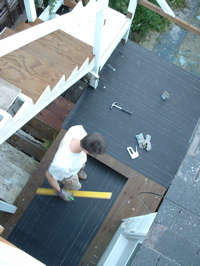
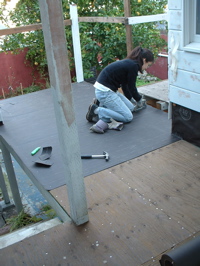
I did the prep work before the contractor arrived. I forgot to take a photo before I started ripping off the old roof. Above right the photo shows where my foot went through the old rotten wood!

03-rotten_2013071004-plywood_20130710

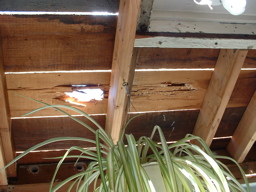
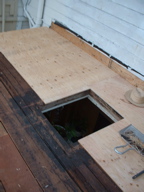
Above left is the view from below. That piece of wood had to be replaced. One top of the old wood, I installed plywood. This is both to provide better earthquake resistance, and to span over weak old wood.

05-insulation_2013071006-thePros_20130710

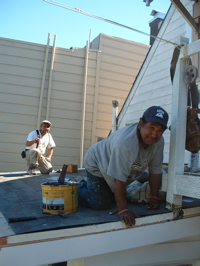
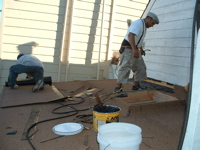
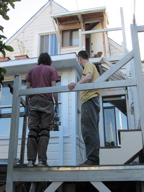
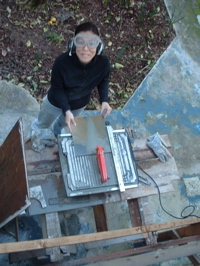
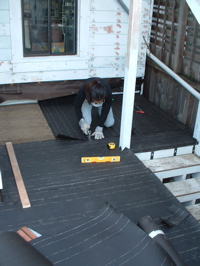
Now the pros showed up. Actually, they told me they’d arrive at 3pm, so I thought I had time to finish the prep before they got here. They arrived three hours early. So they helped me install the insulation for free (I added 2″ of rigid insulation on top of the roof). Above right, Enrique and his assistant smile for the camera.

07-torch_20130710

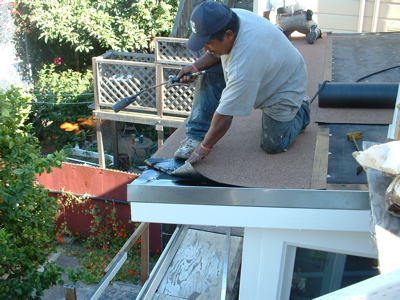
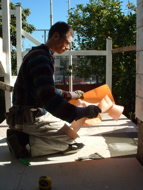
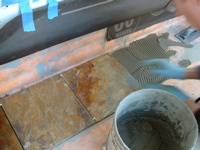
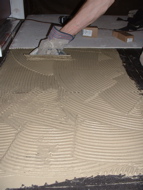
This is the reason the roofing supply salesperson didn’t want me doing the roofing myself: Notice the 18″ long flame coming out of the torch? This is on low. Here, Enrique is melting the back of the modified bitumen roofing, so that it seals down to the roof. Each strip is melted to the previous strip to make a continuous membrane over the roof.

08-corners_2013071009-almost_20130710

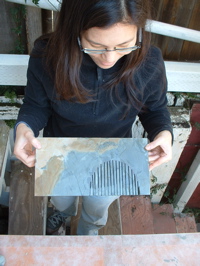
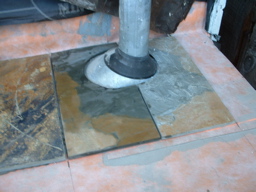
Ironically, after watching the roofers, I realized that fitting the roofing around and over all the tricky corners was where their skill and experience really helped. It would have taken me weeks to do this, and it probably wouldn’t have been done as well in the end. Pick your battles!

10-finishing_2013071011-done_20130710

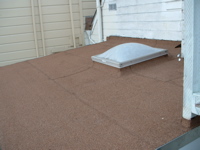
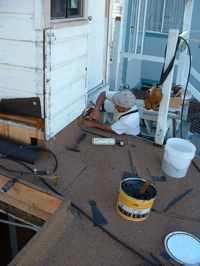
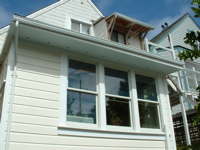
One more photo as they finished up, and here it is done. Beautiful, eh? I managed to salvage the old skylight; took some serious chipping and heat-gun action to get it off the old curb. I’ll probably replace it one day, but for now, it’s fine.

12-gutter_2013071013-garden_20130710

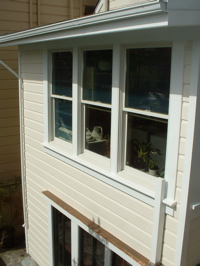
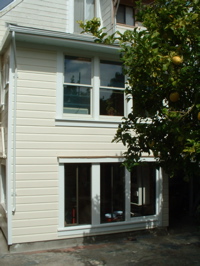
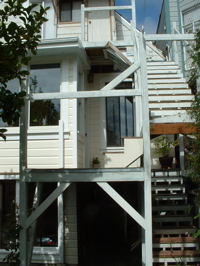
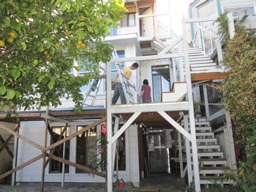
So now we’re done with the outside of the laundry room. All I had to do after they finished the roof is to put the gutter on and paint it. Here’s photos with the scaffolding down.

14-todo_2013071015-closeup_2013071016-closeup_20130710

Now I can start working on the inside without worrying that it will get ruined by rain. Sometimes, it really is worth getting the pros.

misha’s visit part 2

just to prove we do more than work on the house when misha visits, i finally downloaded photos from my camera!

1misha-6.16.13

here we are at the betabrand store. misha and mathew are posing with a creepy mannequin and his silver dog (in mathew’s lap.)

2bella-6.16.13 3arwen-6.16.13

the cats insist on going outside every evening. (left) bella checking out the poppies and bumble bees. (right) arwen hanging out with the nasturtiams

4misha-6.16.13 5misha-6.16.13

i can’t remember what we were doing when these photos were taken. i think we’d just had dinner at cha-ya and come home for tea. mathew is also taking funny self portraits, none of which i have posted. perhaps they will become an animation..?

6arwen-6.16.13 7bella-6.16.13

another outside visit. (left) arwen investigating the new compost tumbler. (right) bella showing off her balancing skills, spying on birds in the tree. she almost caught a bird recently when climbing in the tree, luckily the bird got away!

8misha-6.16.13 9misha-6.16.13

mathew and misha painting and then reviewing their work.

10walk-6.16.13 11walk-6.16.13

(left) we went for a walk into bernal heights with misha and daniel and made a new feline friend. (right) we also found quirky water features advertising a business outside someone’s home: watercontraptions.com

12misha-6.16.13

misha looking out over our beautiful city on a beautiful day. 🙂

13walk-6.16.13 14walk-6.16.13

three bittleston men having a chat on a bench.

15arwen-6.16.13 16arwen-6.16.13

arwen has gotten adventurous again. she’s figured out how to jump onto the other neighbor’s house. i love how casual she is; she has no idea how freaky this is for us!

17arwen-6.16.13 18arwen-6.16.13

when she’d decided she’d had enough, she finally came back to the place she’d originally jumped from and it didn’t seem so fun coming back. she was more than happy to run to the bathroom window where i pulled off the screen and let her in.

19cats-6.16.13

and when they’re not getting into trouble, they spend a lot of time lying around being cute…

fathers-day-6.16.13

and before i forget, HAPPY FATHER’S DAY to our dads! we love you both!

20mathewbella-6.16.13

mathew is currently in new orleans. he had a 3-day master camp training and a belt test that he’s been preparing for for months. HE PASSED!! he’s now a third degree black belt in shotokan karate. (above: bella helping mathew study.)

Waterproofing part 2

The roofing felt and cement board do not themselves waterproof the deck. On this deck, I’m using the same material that we used in the showers: Kerdi. It’s a polyethylene sheeting that has a fibrous material bonded to both sides so that it sticks to thinset mortar.

01-kerdi_20130203 02-kerdi_20130203

Here I’m sticking down the Kerdi over the cement board. Arwen is watching from the stairs.

04-troweling_20130203 05-bellaWatching_20130203

To stick it down, I use the same cement-based thinset mortar that’s used under the cement board, and also will be used under the tile. I spread it out with a notched trowel, and then lay the Kerdi onto it. Then I smooth the Kerdi down with a flat trowel. The problem we were having is the cement board was dry, so it was drying out the thinset mortar before I could spread the sheet down. We had to wet down the cement board with a water sprayer so that we had enough time to stick the Kerdi down properly.

Above right Bella is watching the progress.

06-twoCatInspectors_20130203 07-difficultPart_20130203

They both really like tiling, I think. Almost as much as plumbing (they love to sit in the shower and watch the water go down the drain.) Janeen got all the difficult parts of the waterproofing – like fitting it around a pipe penetration.

08-almostDone_20130203 09-layout_20130203

See, another difficult spot: Mole attaching the waterproofing to the side of the building. Above right we are starting to lay out the tile grid. I drew a grid on the Kerdi before starting the actual tile.

10-startingTile_20130203 11-halfwayDone_20130203

Here are the first tiles. Actually, it’s not tile; we’re using a very colorful slate. We really liked the variety of colors in the slate. Each piece is like a little work of art.

Unfortunately we learned, after buying it all, that this slate has a flaw: The color is made by thin layers of impurities in layers within the slate, so it tends to delaminate. We tried to pick through carefully to avoid the tiles with bad layers in them. Hopefully we caught them all.

12-tileCutter_20130203 13-fancyCuts_20130203

Mole did almost all the cutting. She became the tile-saw queen. Even got into some really complicated cuts to fit the slate tiles around pipes.

14-fancyCuts_20130203 15-tileSet_20130203

Once all the slate was done, we let it dry for a week. Because the slate has such a rough surface, I used a pre-grouting sealer on the slate before grouting. Hopefully it will make it easier to clean the grout off the surface.

17-crocus_2013020316-tileSet_20130203

The crocuses are already up! The bulbs we planted under the lemon tree last year have come back this year. So nice. Above right, you can see a rectangle that we left unfinished. I wanted to make a virtual doormat in front of the door, by changing the tile pattern.

18-doormat_20130203 19-doormat_20130203

We used some ceramic tile that a friend gave me for the border (the same tile I used on the front porch as an accent tile). In the field, we just cut the same tile as on the rest of the deck to about 1/3 the size.

20-readyGrout_20130203 21-grouting_20130203

Above left, this is the ‘door mat’ ready to be grouted. Because the tile is so colorful, we chose a grey grout. I had to get mole to pick out colors, because I’ve learned: I wanted to get a really colorful grout… The grey looks really good.

22-grouting_20130203 23-finishGrouting_20130203

Above left mole is wiping off the grout from the tile surface. Above right, after the grout dries for a couple of hours, we came back with a dry cloth and polished off the haze on the surface of the tiles.

24-doormat_2013020325-Bella-Arwen_20130203

Mole is polishing up the ‘door mat.’ Now we can get back to finishing up the siding! Here’s a pic of Arwen and Bella looking out the window from their cat tree.


Deck Waterproofing and Christmas Eve

Well, a lot happens, and I’ve failed to post any of it. Here’s part one..

01-lampshade_20130203 02-lampshade_20130203

Before we moved into this house, mole found a lampshade made out of shells that she really loved. Unfortunately when she ordered it, it was out of stock, and no longer available. Just recently, the store got some more, so she bought it. We put it up in the bedroom.

03-lampshade-bella_2013020304-deckWaterproofing_20130203

Bella and Arwen really like it too. So, back to house projects: almost a year ago, I stopped working on the back stairs, because I started working on the laundry room. It sounds a bit as if I got distracted and went off to another project. But there’s a reason: After dealing with all the rot in this area I had decided that the deck would be waterproofed. The waterproofing needs to attach to the side of the house, but since the laundry room was so strangely built (there was no waterproofing membrane, just vertical boards) I had to rebuild the wall to add a waterproofing membrane.

One thing led to another, and we started jacking the whole thing up to level it… OK, so it did become a bigger project than I planned. The deck at the first floor sat out in the sun and rain for a year, unfinished, while we basically rebuilt the whole laundry room. I don’t want the deck to endure another winter unprotected, so it’s back to the stairs. Above right, I’m putting down heavy weight roofing felt.

05-janeenStapler_20130203 06-finishingUp_20130203

We stapled it down and lapped it, starting at the lowest side of the deck. Here’s mole just finishing up.

07-lateWork_20130203 08-cementBoard_20130203

The felt is just the first layer. This deck is going to have tile on it, so we put down cement board. To make sure there is a uniform surface under the cement board, we put down thinset mortar first, and set the cement board into that. We then screwed it down to the plywood.

09-cementBoard_20130203 10-cementBoard_20130203

It got pretty late working on this. I think I finished about 10pm. I wanted to get the cement board on before the rain, which was due in the next couple of days.

11-cuties_20130203

They are so sweet when they sleep together. We just can’t help taking photos.

12-paintingHallway_20130203 13-bakingBread_20130203

About four years ago, when we were doing the wallpaper stripping in the lower unit, we started stripping the wallpaper in our front hallway too. We stopped, because it smelled moldy, and we figured we’d need to replace the plaster. Well, it sat with the wallpaper partly stripped for all those years. Talk about bad Feng Shui in our entry! So I decided to just paint white over it. At least it will look better until I get around to the replacement work. Because there’s still no heating, the paint wasn’t drying: I had to bring an electric radiator down there. Arwen came down to watch the progress.

My family came over for Christmas Eve again this year. One of my Christmas traditions now is baking bread. Above right I’m just starting to mix.

14-christmas_20130203

Here’s a pic of everyone who came over. Dad got a picture of Elijah for Christmas, and wanted to include him in the photo!

a new coat of paint

with new tenants moving in, the first thing on the to-do list was to paint over the PINK! and for the record, not everyone hated it. i’d say only 3 or 4 people really disliked it, and everyone else thought it was kinda great. i mean, this IS san francisco.

late on a saturday night last month, mathew, bella, arwen and i got busy masking off trim, baseboards, the window, doors, ceiling and one wall that would remain white. bella and arwen weren’t all that helpful. mostly they spent their time climbing up the ladder, standing proudly at the top, then working up the courage to climb back down.

mathew applying test swatches on four different walls. after mark, jennifer, mathew and i all decided “queen’s wreath” was the best choice, the paint spraying began.

sprayed and waiting for the paint to dry… it’s amazing how many hours prep takes and then with the sprayer, painting is done in minutes.

ta-da! queen’s wreath is a slightly purple, muted, medium blue grey. mathew was skeptical about such a dark color, but we all think it turned out great and works well with the trim and doors. yay team! (mathew did most of the work.)

while mathew was inside painting, i was just outside the bedroom painting the exterior wall and window trim. in the above photos i’m sitting on the 2nd level of the rented scaffolding.

we masked the windows and trim then mathew used the sprayer to paint the final coat. the new paint looks great! as you can see, above right, we still need to sand and paint the other walls…

but the good news is the scaffolding has finally gone back to the rental company. we’d had it for FOUR months! ack. even though it was getting expensive, it had been a busy summer, we’d had lots of friends and family visiting so we barely had time to work on anything.

now on to one of our other 200+ projects.

and my next post will have absolutely nothing to do with the house. 😉

Foundation, Flowers, Travels, Walls!

Quite a bit has happened, both before I went to England and Brooklyn, and after. As usual, I over estimated how much we could do. I wanted to get a new foundation poured, and walls built to support the laundry room before I left. We almost got there…

The old walls around this space had been built in stages. Initially, it was probably open, and just posts supported the floor. Then siding was added. Then concrete. So the siding was buried in concrete, and very rotten. We tore out everything, leaving the laundry room sitting up in the air.

The problem (well, one of them) with being an amateur: Even if I know how to do something, sometimes I forget, because I do it so rarely. When laying out the foundation, I forgot that you are supposed to stretch string out to lay out the sides. That helps get them straight, and is easier than snapping chalk lines. I snapped chalk lines.

As you can see, I’m not doing real foundations, just putting a concrete wall on top of the old concrete slab. It will lift the wood framing up, so that it’s not sitting in water. Hopefully will stop the rot.

We drilled and epoxied threaded rod into the old slab, and made sure they were sticking up high enough so that we can use them to attach the new wall to the concrete.

The formwork took a whole weekend to make.

The next week, in four car trips, I got the concrete, and rented a mixer. Janeen and I poured the new concrete walls in a day. I spent quite a while cleaning up, and trying to smooth and flatten the top.


And that’s as far as we got before I took off. I screwed some plywood onto the outside, and hoped for no earthquakes.

When I got to Brooklyn, I pulled out the gifts that Janeen had made: Pocket Bears! She said that Misha and Aja could pick whichever ones they wanted. Misha had a lot of trouble (he wanted them all I think.)

Arwen and Bella glamor shot!

Spring is really here. The flowers are all out in our garden. Janeen took these photos while she was outside with the cats.

Here is Bella inspecting the foundations that have been setting for a week by now.

I forgot to take photos when I was in England (because my phone wasn’t working, I didn’t even think of trying to use the camera. Oh well. I spent a week in Stroud, enjoying beautiful weather, and Mum’s great cooking. 🙂

I stopped back in Brooklyn as I returned, and one day there was a track meet! Managed to snap a photo of Misha running the 800 meters, and Aja running a relay.

Nails! [Mole note: these nails are almost 100 years old! they are hand made. see how they are not round? they have corners! so cool.]

Yes, we’re back at it. And there was a 4.0 earthquake while I was gone. Fortunately, it was quite small, so nothing fell down.

Besides peach blossoms! The Freesia are blooming.

Drilling holes, and then putting the sill plate onto the new concrete. Above right, I’ve painted wood preservative into the drilled holes, and hammered the plate over the threaded rod anchors. It fits!

Janeen is dismantling the ‘Jenga’ that was supporting the laundry room. Above right is one of the pieces of wood that the jack was pushing on. I guess it was pushing quite hard!

Above left, building a new wall. Above right, with pile of wood supports removed!

Above left: I made a mistake measuring for one of the anchor bolts, so the washer and nut will extend into one of the posts in the wall. Janeen used a chisel and notched out the bottom of the post to fit over the square plate washer. Nice!

Above right: The plywood on the far left is a new shear wall. The rest of the panels are temporary. I’ve got some old aluminum windows that I am planning to resize and fit here.


Jack!

We did jack this weekend.

It took most of Saturday to get the supports and bracing in place. I added diagonal bracing below, to try to stabilize everything as much as possible. When the back room is cut off the house, the only thing stopping it from toppling over will be these braces. I wore my hard hat so that I didn’t keep hitting my head. Looks more professional, too!

Using a reciprocating saw, I cut all the way round, through the nails that held the laundry room onto the house, completely separating it from the house. We also disconnected piping (well, most of it – see later) and other things that held the floor to the house.

Above left you can see the step (red) between the kitchen and the laundry room.

Once we started jacking, Janeen ran outside and took a photo (above right). You can see a gap under the framing that is going up with the floor, and the wall below.

Above left, there’s about six inches between the floor and the wall below. Above right, this is half way there.

While we were pumping the jack, there were all sorts of creaking noises. Sometimes there was the sound of splitting wood, or sudden cracks. After one noise, I went outside, and found that I’d forgotten to disconnect the sewer pipe from the wall, so it was being lifted up with the room and had separated at a joint. I had to disconnect it, and carefully slide it back down into place (while up on a ladder, leaning on the room sitting on temporary supports – above left).

Above right, you can see light shining through a gap between the house and the laundry room. The whole thing would tilt sideways as we jacked up one side. Then it would tilt back when we jacked the other side. I didn’t realize it would tilt around this much, and am really glad I put in the bracing. It’s quite scary being underneath all this with the jack.

Janeen kept calling it ‘reverse Jenga’. I have one 20-ton jack but have six support points to lift the room at. We put the jack onto one of the supports, and pumped it until it lifted that side about 1 1/2″. Then I slipped a couple of 2×4’s into the gap, and let the pressure off the jack. Then we moved it to the next location. It took all day.

Above right, here’s the gap after getting the floor to the right level.

Above left: Flush! There’s no more step down. Above right, the whole room was moving around while we jacked it up. At one point, I noticed that as I was jacking, the room was moving sideways. A piece of wood had got stuck, and was levering the whole room sideways about 1/4 inch before I stopped. To get it back into place, I screwed a block of wood to the floor joists of the laundry room, and a block to the side of the house. Then I tightened a clamp between the two pieces of wood to pull it over. It worked!

Above left, here’s a nice (scary) pile of wood supporting the laundry room. Above right, at this side of the room, it raised up about a foot, because the floor of the laundry room (in addition to the step), sloped away from the building.

It’s been a funny winter. Actually, I think there was none. It only rained two or three times. And now it’s spring. The daffodil, crocus and iris bulbs that we planted around the tree are popping up. And the peach tree is coming into blossom already. Janeen took a photo of a couple of sprigs we brought in and put into water.

brackets

Been so busy lately, that almost nothing has happened on the back stairs. But I am starting to make some fancy brackets out of old redwood…

I took a photo of the brackets on the front of the house, traced them and adjusted the image to fit the dimensions I need on the back deck in CAD. Then I printed out the CAD image.

I pasted the printout onto a piece of wood, and cut it out. Above left, I’m showing off the template to Janeen and Bella.

The wood from the tear off room is now stacked up in the garage. I ran one of the planks from the old sub-floor through the planer to see how it looks. Above right – it’s actually quite nice old oak. Bella likes it. It has some stains from rusting nails that would need to be plugged, but I think I can use it.

Using old pieces of Redwood from the rotten stairs and tear-off room, I’m piecing together new brackets. Above left, clamping and gluing. Above right, after I’ve run it through the band saw. I still need to rout out the sun-ray part, rout in beading, and sand the whole bracket smooth. And I’m making five of these.

The weather has been weird this winter. We’ve had almost no rain. Last week, we went out and bought a bird feeder, and hung it in the lemon tree! We also had an arborist come over and prune the lemon tree.

While the Arborist was here, he planted a new Espalier apple tree where we used to have the Avocado. It’s a funny looking tree right now, because it’s been carefully pruned so that it grows horizontally and flat.

Sad that we tore out the Avo, but hopefully we’ll have nice Fuji apples, and the tree won’t take up the whole garden. We’re also waiting for a pear tree.


Mrs Simmons’ Sewing Room

Last weekend my neighbor came over to help again, and we finally got the “tear-off room” (as we called it) torn off.

Above left, with all the roofing and siding removed. I got really covered in dirt, as I had to cut through the roofing from below.

A last look into the tear-off room from the laundry room (left), and the view from up above. It’s strange taking something apart like this. Most contractors pull out a sledge hammer, and smash everything down. It’s done in half a day. Then they have a huge pile of landfill.

I’ve been trying to carefully deconstruct the space so that I can reuse much of the materials. Still, there’s quite a pile: Roofing breaks up, and has come to the end of its useful life anyway; some wood is too rotten or broken or small to salvage; the old aluminum single pane window didn’t slide any more and the catch was broken….

But the result of working like this is that it’s exactly the reverse of building it.

Here’s Nick, my neighbor-assistant, monkeying from the last of the roof joists before he tore them down. Above right, when my neighbor on the other side came out and saw this, he told me a story.

He reminiced how Mr Simmons, who was born in about 1870, built this room. Even though the ceiling in this room was about 5′-10″ high, apparently Mr Simmons was about my height. He built the room as a sewing room for his wife. “Mrs Simmons’ Sewing Room” makes it sound so nice; I can almost forget what a dingy, damp, moldy, cramped, low-ceiling little cell it was.

Above is the view of the back of the laundry room. The two doorways are boarded up right now. I plan to put windows all across this wall, looking out onto the garden. Even though Mrs Simmons’ sewing room was tiny, it really took up a lot of the garden.

Now I have a big pile of wood. Nick started pulling nails. But I still have a huge pile to pull nails out of.

Root Freedom

Over the past month, I’ve had a lot of work, so not much progress on the house. But last weekend the sun was out, and it was just beautiful winter weather to get a bit more done on the stairs. I pulled another “while I’ve got this open, I’ll just…”

The back porch upstairs smells moldy, is drafty, and has no insulation. So I started tearing off the siding, and added plywood. In the photo above left, the last of the old stairs is peeking out. Gone in the above right. And more nice plywood glamor shots.

Now I’ve got the stair framing replaced all the way up. Still need to finish the hand rails, painting, and.. and…

Meanwhile, we built up a rather large pile of rotten wood, and other debris. For months I’ve been trying to put a bit at a time into the garbage can. I finally went out and rented a truck. We piled it full – over a ton of landfill! Now we need to finish tearing off the ‘tear off room’. Above right, partway through pulling off the old siding.

My mum will like this: A couple of weeks ago I had an Arborist over to look at our lemon tree, and the other trees in the back yard. His first suggestion was to tear out the concrete around the tree. He said that putting concrete over roots creates a similar problem to over-watering house plants: The roots can’t get any air and are susceptible to rot.

It took about three hours with a rented jack hammer to take out most of the concrete. The tree looks so much less strangled by the concrete. Now the Arborist is going to come back and do some pruning and put in a couple of Espalier fruit trees. My mum hated all the concrete in the back yard. I agree; now that much of the concrete is gone, I feel like the garden is starting to come back to life.

I think Arwen wants to be a plumber: Here she’s looking out the kitchen window watching the contractors installing a new flue. The old furnace was starting to smell of fumes, so we had to replace it. The new one is about half the size. We didn’t get a super high efficiency furnace, but it’s supposed to be about 50% more efficient than the old one.

I also started to put in the final leg of the stairs. Because it’s cold out now (by our standards), I paint everything in the garage first.

On my way home a couple of days ago, I walked by a garage sale. They had this nice mirror hung off a tree. The cats seem to think it was a good buy.

“I feel pretty
Oh so pretty…”