full steam

We rented the wallpaper steamer again this weekend and finally finished steaming the layers of wallpaper and paint off the walls in the office…

We’d removed the lower half of the wallpaper already, so now it was all working up ladders. The photos make it look like it just happened quickly, but it was slow going: We had to scratch up the surface of the wallpaper so that the steam could get through the paint, and then it was about four passes on every foot square to get down to the plaster.

At the end of Saturday, we’d got through most of the room: Just the area above the windows and the wall over the fireplace left to do.

Janeen found that steaming went much faster if she scraped off as much of the paint as possible before trying to steam. In some places, the wallpaper would partially separate, or some of the paint layers would come loose. Those were the fun bits.

In some places, it seemed like the wallpaper had been attached with some type of superglue: we’d steam it for a couple of minutes, and still the wallpaper would only come off in tiny little 1/2″ pieces, then we’d steam and scrape and steam and scrape… In the photo above right, there’s a bin below janeen: we completely filled that with soggy wet wallpaper scraped off the walls.

unclear on the concept

The photo above right is titled “unclear on the concept.” The previous owners screwed a hook into the picture rail: what did they think picture rails are for if not to hang pictures from?

janeen cleaning up wallpaper scrapings

I love the look of the plaster after the wallpaper has been removed. It’s a pity that this house has such cracked plaster, as I’d love to find a way to just keep it as it is. The mottled yellow/orange color and the smoothness of the 100 year old plaster are impossible to replicate, and paint seems so bland in comparison.

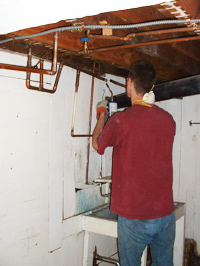
I also got some of the insulation into the floor in the area we were doing electrical work; not easy to jamb fiberglass insulation around all that conduit, wire, framing…

The photo below right shows the beam that was added to the house when they put in the garage in the 50’s: I never noticed before, but it’s BENT! Much of the cracking in the plaster was caused, I think, when they did the garage addition. The beams they used were not stiff enough, and deflected too much, cracking the beautiful plaster walls in the process: Cars and architecture are not friends. I also added a 2×6 on the front and back to make sure the beam stays on the post in an earthquake (wouldn’t want it falling off, or the post falling over!) Now I just need to get plaster board back on the ceiling.

Getting all the wallpaper off the office walls makes things feel like they are moving again: now we’ve just got to fix the plaster, strip the paint off the woodwork, sand, stain, seal, paint, replace the windows, make the built-in furniture… almost done. ahem.

an electrical weekend

it was a busy social weekend for us! saturday we were in palo alto for our friends’ son’s birthday party, stopped by to wish my brother a quick happy birthday and had dinner with an old high school friend and his son. on valentines day we had dinner with my grandmother, aunt and uncle to celebrate chinese new year at a local italian restaurant.

this last weekend we worked on electrical projects in the garage. it was time consuming and wasn’t all a priority but it greatly improves the safety of our home.

wires1_2.14.10wires2_2.14.10

wires, wires everywhere!

oldwires3_2.14.10oldwires4_2.14.10

an assortment of electrical goodies (nightmares) found in our garage. yikes! i’m no electrical expert, but this just looks wrong.

tool5_2.14.10janeen6_2.14.10

(left) my favorite tool this weekend, it strips the plastic coating from electrical wire, leaving the copper exposed and unharmed. (right) yep, mathew had me working on electric projects this weekend. on sunday i was helping mathew while he worked, on monday he put me to work on my own projects!

switch7_2.14.10switch8_2.14.10

the 3-way light switch i wired myself! (please excuse the need for touch-up paint…)

while i worked yesterday, with every new project i had to ask, “is this live? is it turned off?” because i’ve had some scary electrical accidents in the past, i just needed to be totally sure i wasn’t going to be electrocuted! it never hurts to be safe.

mathew9_2.14.10mathew10_2.14.10

at times it was complete wiring chaos…

done12_2.14.10done11_2.14.10

here are a couple of the completed projects. not much to look at, but very much improved!

hope everyone had a nice valentines/chinese new year weekend!

slowing down

lists_20091124Now that Popo has moved in, we have slowed down a lot. It’s been over two years of working nonstop on the house. The photo shows a few of the checklists we made — with everything checked off. Feels a bit like I am climbing out of a hole that I’ve dug for myself! Hmm. Mole references…

Over the past couple of weeks, we finished up the back door and put it back on. The laundry room and ‘tear-off’ room leak a lot of cold air, so the kitchen had been rather drafty. The hardware for the original door was some of the nicest decorative brass on all the doors (below left). This is the original brass hardware for the back door after Janeen and I polished it up and removed all the old paint.

backdoor3_20091124backdoor2_20091124

The door was stripped, carefully sanded, stained with “Early American” oil based stain and then two coats of integrally colored polyurethane “Natural Cherry”. I sanded the polyurethane between coats with a very fine grit (220) sand paper to help the polyurethane adhere better, and also remove any dust or roughness that got into the first coat of urethane. The doors all have an aged but cared-for look to them now, and the color polyurethane helps to unify the color of the door, filling, and any blemishes.

backdoor1_20091124backdoor4_20091124

Above right, you can see the door installed in the background.

I also made some built-in shelves for the living room. In the space where there used to be a door between the living room and the bedroom, we now have built-in shelves for photo albums. I found pieces of wood for the shelves in the rather extensive pile of wood I’ve built up. Also the trim that holds them up is recycled:

shelves1_20091124shelves2_20091124

To make the front edge of the trim look finished and more decorative, I cut off and bevelled the trim, and added a piece of the same trim to return it to the face of the wall. Below right is a matching pair (left and right side).

shelves3_20091124shelves4_20091124

shelves6_20091124 shelves5_20091124

Above are the shelves as they are being installed. I had a bit of a dilemma: when in an old house where the floors, ceiling, doors (everything) slopes at various angles, do you install shelves so they slope the same as the floor? the tops of the doors? the ceiling? or ignore all that, and make them horizontal? I decided to make them slope the same as the top of the old doorway, so the shelves and the trim will at least both have the same slope…

While Janeen was out of town (she went to visit her “sisters” up in Seattle), I put insulation and gyp board on the ceiling of what used to be a bit of a scary little room in the garage. The photo below left shows it as it was a couple of years ago. Below right is with the gyp board on the ceiling, all the piping and wiring are now hidden.

garageroom1_20091124

The kitchen is quite moved in. Popo is doing her ‘homework’ (as she calls it). In the background you can see the outdoor steps in the back yard that go up to our unit and still need much work…

popo_20091124

a gift from bob

a gift from mathew’s co-worker, bob. mathew has it proudly displayed as you walk downstairs to the garage. my only question is “why did he leave the shrink wrap on it?” lazy? trying to make a statement?