most boring post EVER!

If you are hoping for kitten photos, or even human photos, read no further. I’ll blame this on mole: I can’t take photos of myself doing things.

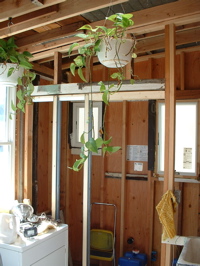
Now that the roof doesn’t leak any more (well, I assume it doesn’t — it hasn’t rained in quite a while), I can work on the inside of the laundry room. First thing: I put in the framing for a new pocket door. I bought the kit almost a year ago, finally installed it (hiding behind the hanging plants):

01-newDoor_2013072302-skylightBefore_20130723

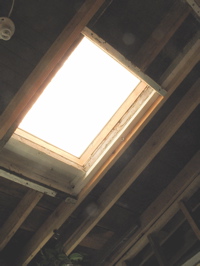
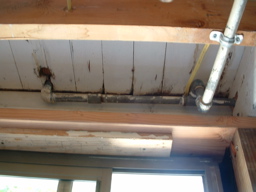
The one thing that bothered me after the roofing was done is that I failed to buy a new skylight that fit the opening in the roof properly. So, retrofit: the photo above right sort of shows how the framing sticks into the space of the skylight. I spent a day with the reciprocating saw cutting out joists, and putting in reinforcement. Mole said the whole house was rattling from the noise. To me, it looks better…

03-skylightAfter_2013072304-canLights_20130723

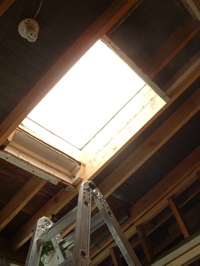
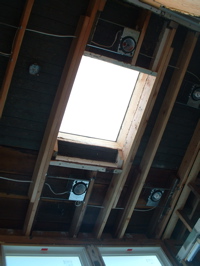
But the photo above left really doesn’t show it. Oh well. Above right, I’ve put in new recessed light fixtures. This is going to be a fancy laundry room.

05-plumbing_2013072306-plumbing_20130723

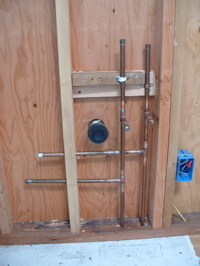
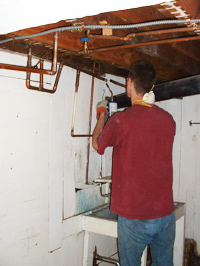
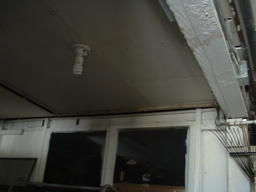
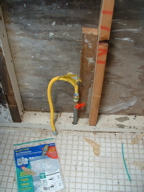
Oh, and the really, really boring stuff: Plumbing. Well, it’s rather exciting when it doesn’t work, I suppose. Here I’m putting in the rough plumbing for the sink and shower. I don’t have the controls yet for the shower, so the pipes just end after they stick through the stud. Above right: the pipes below the laundry room floor.

07-gas_2013072308-gas_20130723

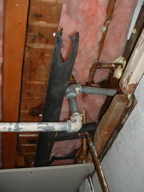
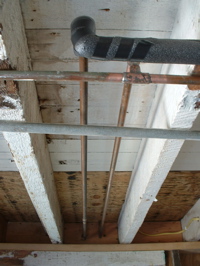
Of all the projects on this house, the most intimidating is gas piping. Everything else, there’s some type of warning or fuse if somethings done wrong. With gas, I guess you smell it: But it feels like if this is done wrong – BOOM! So, I used lots of joint lube, cleaned the threads meticulously, and tightened every joint to the extreme. Above left is the pipe going above the ceiling in the garage, above right, where it transitions to go to the garden room (fancy!).

09-gas_2013072310-gas_20130723

Above left, it tees to go up to the laundry room (for the dryer), and I added a pipe that will allow a stove down in the garden room (beer brewery maybe?). I went over every connection with soap to check for leaks: None! I did find a slow leak in three valves, though, and managed to tighten them up.

Oh, and these photos are the last photos that our first digital camera will take. It finally quit, after over ten years (almost every photo in this blog was taken with it).

Jack!

We did jack this weekend.

It took most of Saturday to get the supports and bracing in place. I added diagonal bracing below, to try to stabilize everything as much as possible. When the back room is cut off the house, the only thing stopping it from toppling over will be these braces. I wore my hard hat so that I didn’t keep hitting my head. Looks more professional, too!

Using a reciprocating saw, I cut all the way round, through the nails that held the laundry room onto the house, completely separating it from the house. We also disconnected piping (well, most of it – see later) and other things that held the floor to the house.

Above left you can see the step (red) between the kitchen and the laundry room.

Once we started jacking, Janeen ran outside and took a photo (above right). You can see a gap under the framing that is going up with the floor, and the wall below.

Above left, there’s about six inches between the floor and the wall below. Above right, this is half way there.

While we were pumping the jack, there were all sorts of creaking noises. Sometimes there was the sound of splitting wood, or sudden cracks. After one noise, I went outside, and found that I’d forgotten to disconnect the sewer pipe from the wall, so it was being lifted up with the room and had separated at a joint. I had to disconnect it, and carefully slide it back down into place (while up on a ladder, leaning on the room sitting on temporary supports – above left).

Above right, you can see light shining through a gap between the house and the laundry room. The whole thing would tilt sideways as we jacked up one side. Then it would tilt back when we jacked the other side. I didn’t realize it would tilt around this much, and am really glad I put in the bracing. It’s quite scary being underneath all this with the jack.

Janeen kept calling it ‘reverse Jenga’. I have one 20-ton jack but have six support points to lift the room at. We put the jack onto one of the supports, and pumped it until it lifted that side about 1 1/2″. Then I slipped a couple of 2×4’s into the gap, and let the pressure off the jack. Then we moved it to the next location. It took all day.

Above right, here’s the gap after getting the floor to the right level.

Above left: Flush! There’s no more step down. Above right, the whole room was moving around while we jacked it up. At one point, I noticed that as I was jacking, the room was moving sideways. A piece of wood had got stuck, and was levering the whole room sideways about 1/4 inch before I stopped. To get it back into place, I screwed a block of wood to the floor joists of the laundry room, and a block to the side of the house. Then I tightened a clamp between the two pieces of wood to pull it over. It worked!

Above left, here’s a nice (scary) pile of wood supporting the laundry room. Above right, at this side of the room, it raised up about a foot, because the floor of the laundry room (in addition to the step), sloped away from the building.

It’s been a funny winter. Actually, I think there was none. It only rained two or three times. And now it’s spring. The daffodil, crocus and iris bulbs that we planted around the tree are popping up. And the peach tree is coming into blossom already. Janeen took a photo of a couple of sprigs we brought in and put into water.

Head Banger

Besides working my tail off on paid work, I’ve been plodding forward on the house, preparing to raise up the floor of the laundry room.

The floor framing in this space was done without much help from engineering. It also did not leave much head room in the space below (I can’t remember how many times I’ve hit my head — probably once a day — working on this.) In place of the two undersized beams that span across, I’m replacing with a slightly deeper beam, but I’m setting the top of it flush with the top of the joists. I have to cut all the joists to get it in. Janeen caught a photo of me after I’d cut a couple of the joists. No going back now.

Janeen spent most of last weekend pulling nails out of old pieces of wood. I’ve got such a pile now, I need to figure out a project to use it all on.

Using some old wood, we made some support contraptions to fit the jack, and support the floor while we jack it up. It was a bit tricky getting them in place: I managed to break two windows simultaneously when the post fell over and smashed them (left). Right now, I’ve got the beam in the middle, and have put load onto the first two support posts. How do I know that they are carrying the weight (see below)?

This is a photo looking at one of the old beams (above left).

Two things: One, there’s now a gap under it, because all the weight is on the new beam. But the second is the troubling thing in earthquake country: When the previous person did this, they just sat the beam on top of loose blocks of wood. That’s fine until the building starts shaking around: Then, the blocks would just slide out, and the whole room would have come down! Speaking of earthquakes, I also added more plywood on the wall upstairs. The wiring for the light switch is just temporary!

Next, I have to get the outside walls supported, and disconnect this room from the building. Then I can start jacking…

slowing down

lists_20091124Now that Popo has moved in, we have slowed down a lot. It’s been over two years of working nonstop on the house. The photo shows a few of the checklists we made — with everything checked off. Feels a bit like I am climbing out of a hole that I’ve dug for myself! Hmm. Mole references…

Over the past couple of weeks, we finished up the back door and put it back on. The laundry room and ‘tear-off’ room leak a lot of cold air, so the kitchen had been rather drafty. The hardware for the original door was some of the nicest decorative brass on all the doors (below left). This is the original brass hardware for the back door after Janeen and I polished it up and removed all the old paint.

backdoor3_20091124backdoor2_20091124

The door was stripped, carefully sanded, stained with “Early American” oil based stain and then two coats of integrally colored polyurethane “Natural Cherry”. I sanded the polyurethane between coats with a very fine grit (220) sand paper to help the polyurethane adhere better, and also remove any dust or roughness that got into the first coat of urethane. The doors all have an aged but cared-for look to them now, and the color polyurethane helps to unify the color of the door, filling, and any blemishes.

backdoor1_20091124backdoor4_20091124

Above right, you can see the door installed in the background.

I also made some built-in shelves for the living room. In the space where there used to be a door between the living room and the bedroom, we now have built-in shelves for photo albums. I found pieces of wood for the shelves in the rather extensive pile of wood I’ve built up. Also the trim that holds them up is recycled:

shelves1_20091124shelves2_20091124

To make the front edge of the trim look finished and more decorative, I cut off and bevelled the trim, and added a piece of the same trim to return it to the face of the wall. Below right is a matching pair (left and right side).

shelves3_20091124shelves4_20091124

shelves6_20091124 shelves5_20091124

Above are the shelves as they are being installed. I had a bit of a dilemma: when in an old house where the floors, ceiling, doors (everything) slopes at various angles, do you install shelves so they slope the same as the floor? the tops of the doors? the ceiling? or ignore all that, and make them horizontal? I decided to make them slope the same as the top of the old doorway, so the shelves and the trim will at least both have the same slope…

While Janeen was out of town (she went to visit her “sisters” up in Seattle), I put insulation and gyp board on the ceiling of what used to be a bit of a scary little room in the garage. The photo below left shows it as it was a couple of years ago. Below right is with the gyp board on the ceiling, all the piping and wiring are now hidden.

garageroom1_20091124

The kitchen is quite moved in. Popo is doing her ‘homework’ (as she calls it). In the background you can see the outdoor steps in the back yard that go up to our unit and still need much work…

popo_20091124